The vast majority of hydraulic hose failures do not happen in the middle of the line. They occur right at the connection point. Improper crimping practices cause almost all these connection failures. A blown hose represents much more than a routine maintenance headache. It triggers costly unplanned downtime. It often causes hazardous environmental fluid spills. It also creates severe safety liabilities for heavy equipment operators. Relying on operator guesswork compromises your entire hydraulic system.
You need to transition from reactive troubleshooting to a verifiable assembly process. We will explore how to guarantee assembly integrity on your shop floor. You will learn how to identify common hose crimping defects before they fail in the field. You will also discover how to align your daily operations with strict SAE and ISO industry standards.
Key Takeaways
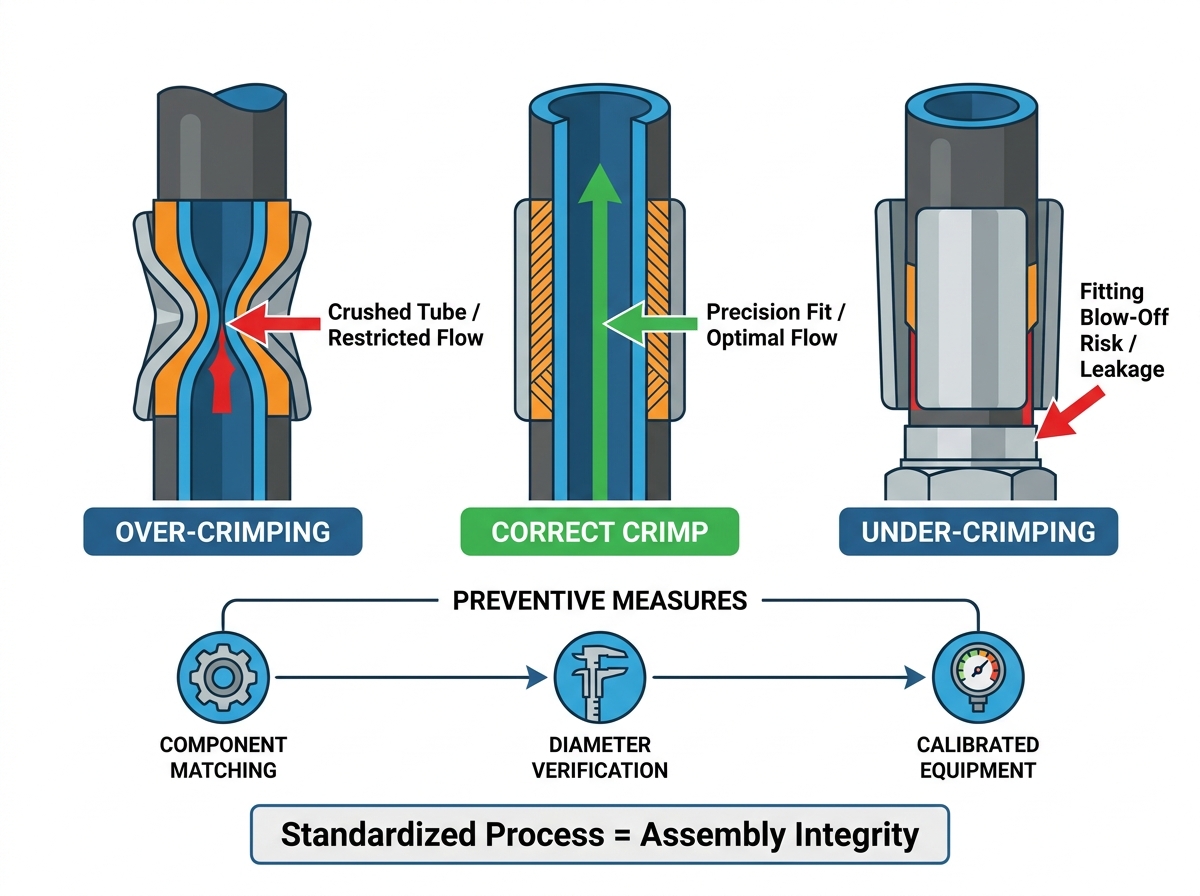
Precision Over Guesswork: Over-crimping and under-crimping are the leading causes of assembly failure, both rooted in bypassing exact manufacturer crimp diameter specifications.
Component Compatibility is Non-Negotiable: Mixing hose and fitting brands creates unpredictable tolerance stack-ups, directly contributing to fitting blow-offs.
QA Standardization is Required: Visual inspection is insufficient; verifying crimp integrity requires calibrated calipers, correct measurement techniques, and periodic hydrostatic testing.
Equipment Lifespan: Inconsistent crimps often signal that the crimping machine's dies are worn or the calibration mechanism requires upgrading.
The True Cost of Hose Crimping Defects in Industrial Operations
Safety and Compliance Risks
Fluid injection injuries are catastrophic. High-pressure hydraulic fluid can easily pierce human skin. This happens instantly when a fitting blows off under pressure. Toxins enter the bloodstream immediately. Operators often require emergency surgery. OSHA investigates these workplace safety incidents vigorously. Fines for negligence quickly accumulate. Safety and compliance risks demand absolute precision in assembly. You must protect your operators. Strict adherence to proper crimping protocols prevents these severe injuries. Companies cannot afford to ignore basic assembly safety guidelines.
Financial Impact of Unplanned Downtime
Unplanned downtime causes massive financial losses. One single failed line stops a production run completely. You face lost production hours immediately. Emergency technician call-outs carry premium hourly rates. You also have to purchase replacement hydraulic fluid. Environmental cleanup crews add another layer of expense. The cascading costs quickly overwhelm maintenance budgets. Proper crimping prevents these expensive emergencies. Investing time in quality assurance saves thousands of dollars later. A cheap crimp always costs more in the long run.
The "Hidden" Cost of Premature Failure
People often miss the hidden costs of premature failure. Bad crimps restrict fluid flow. They also cause microscopic leaks. These tiny leaks force pumps and valves to overwork. Secondary system components wear out fast. They fail long before the actual hose bursts. You might replace a pump without realizing the root cause. A crushed inner tube acts like a bottleneck. It generates excess heat in the hydraulic system. Heat degrades seals and o-rings rapidly. Preventing defects extends the life of your entire machine.
Identifying Common Hose Crimping Defects and Their Root Causes
Operators must recognize visual and structural defects early. Catching mistakes on the workbench prevents disasters in the field. We outlined the most common failures below.
Defect Type
Primary Symptom
Common Root Cause
Over-Crimping
Distorted ferrule; collapsed inner tube
Wrong die size; ignored specifications
Under-Crimping
Weeping fluid; sudden blow-off
Low machine pressure; worn dies
Incorrect Insertion
Uneven grip; leaks at the junction
No insertion depth mark; operator rushing
Improper Skiving
Early separation of fitting and braid
Dull skiving tools; wrong skive length
Over-Crimping (Crushed Tube/Wire Damage)
Over-crimping destroys the internal structure of the hose. The fitting ferrule looks excessively distorted. The inner tube collapses inward. This collapse severely restricts hydraulic fluid flow. Metal teeth crush the steel wire reinforcement. The wire braid eventually breaks under normal flexing. Using the wrong die size causes this issue. An incorrect micrometer setting also leads to over-crimping. Operators sometimes ignore manufacturer crimp specifications entirely. They assume tighter is always better. You must train staff to avoid this dangerous misconception.
Under-Crimping (Fitting Blow-Off)
Under-crimping creates a ticking time bomb. The ferrule fails to grip the wire braid properly. You will often see weeping fluid at the fitting base. A sudden detachment of the fitting occurs under operational pressure. The fitting blows off violently. Insufficient crimping pressure causes this failure. An operator might stop the machine prematurely. Worn crimper dies also fail to apply enough force. The crimp diameter remains larger than the required decimal specification. This defect requires immediate intervention.
Incorrect Insertion Depth
Hose insertion depth dictates holding power. Leaks develop rapidly at the junction. The ferrule exerts an uneven grip on the hose wire reinforcement. The metal teeth bite into empty space instead of the hose. Failure to properly mark the hose causes this. You must mark the depth before insertion. Operators often skip this step to save time. Rushing the assembly process guarantees inconsistent insertion. A simple chalk or marker line prevents this entirely. It provides visual confirmation during the crimping phase.
Improper Skiving (Where Applicable)
Many high-pressure hoses require external skiving. This means removing the outer rubber cover. Improper skiving leads to poor adhesion. The fitting separates from the wire braid early. Removing too much rubber damages the wire underneath. Removing too little prevents the ferrule from gripping the steel. Operators sometimes use dull skiving tools. Dull tools tear the rubber instead of cutting it cleanly. Torn rubber leaves an uneven surface. Precision skiving ensures the fitting teeth engage the reinforcement layer securely.
Diagnostic Framework: How to Inspect and Qualify a Crimped Hose
Crimp Diameter Verification (The Golden Rule)
Measuring the final crimp diameter is mandatory. We call this the golden rule of assembly. You must use calibrated vernier calipers. Place the caliper jaws across the flat surfaces of the crimp. Never measure the raised ridges or gaps. The ridges give a falsely large reading. Measure the diameter across multiple flats. Average the readings to account for slight ovality. Ensure the final number matches the manufacturer's precise decimal specification. Throw the assembly away if it falls outside the tolerance window.
Visual and Tactile Indicators
Visual inspection acts as your first line of defense. Inspectors should look for even spacing of die marks. Uneven marks indicate a misaligned die bowl. Check for the absence of metal flaking. Metal flakes suggest the dies are scraping the ferrule. Verify the insertion mark is flush with the ferrule base. The mark proves the hose did not push out during compression. Run your fingers over the crimp. It should feel uniform. Any sharp edges require immediate machine inspection.
Go/No-Go Gauge Testing
Go/No-Go gauges provide rapid mechanical checks. They verify thread and seat integrity post-crimping. Over-crimping sometimes distorts the fitting threads. A distorted thread will not seal against the mating port. Insert the Go gauge into the fitting nut. It should thread smoothly. The No-Go gauge should fail to enter. This simple test confirms the structural geometry remains intact. It prevents technicians from installing ruined fittings onto heavy machinery. You should keep these gauges stationed at every crimping bench.
Hydrostatic Proof Testing
Visual checks cannot see inside the fitting. Hydrostatic proof testing validates the actual holding power. SAE guidelines recommend testing the assembly at twice the intended working pressure. You pump pressurized water into the sealed hose. Hold the pressure for a specified time. Look for pressure drops or weeping at the joints. This establishes the absolute necessity of pressure testing. You must test assemblies before installing them on high-risk machinery. It guarantees the crimp can handle extreme operational spikes.
5 Standardized Steps to Prevent Crimping Failures
Step 1: Enforce Strict Component Mating. Mandate the use of matched hoses, fittings, and ferrules. You must buy these from the same manufacturer. Mixed brands create unpredictable compression dynamics. Manufacturers engineer their ferrules to bite specific rubber compounds. Mixing them guarantees tolerance stack-ups.
Step 2: Utilize Accurate Cut and Prep Protocols. Highlight the importance of square cuts. An angled cut prevents the hose from seating fully inside the fitting. Use a proper hose saw. Draw an exact insertion depth marking prior to crimping. Clean the inner tube to remove debris.
Step 3: Mandate Daily Machine Calibration. Operators must verify the zero-point of the crimper daily. Temperature changes and daily wear alter machine calibration. Test a scrap piece before beginning a production run. Measure the scrap crimp. Adjust the machine dial if the measurement drifts.
Step 4: Implement Die Maintenance Schedules. Establish criteria for inspecting dies. Look for wear, galling, or cracking. Damaged dies transfer defects directly to the fitting. Clean the dies and apply the recommended high-pressure grease. Dry dies stick to the ferrule and ruin the crimp.
Step 5: Document and Track Assembly Data. Recommend logging specific crimp specs. Record operator IDs and material batch numbers. Modern shops use digital logs for traceability. This data enables accurate root-cause analysis. It helps pinpoint the exact problem if a field failure occurs.
Evaluating Crimping Equipment for Defect Prevention
When Operator Error is Actually an Equipment Problem
Managers often blame operators for assembly failures. However, outdated machinery frequently causes these issues. Old manual crimpers force operators to guess. Analog dials drift out of calibration easily. Pumping a manual handle leads to inconsistent pressure application. Fatigue sets in during large production runs. The equipment simply cannot hold tight tolerances anymore. High defect rates usually point to failing machinery. Upgrading the equipment eliminates the root cause entirely. It removes human error from the equation.
Key Features of High-Reliability Crimpers
Modern equipment includes several critical features to ensure safety.
Micro-Dial/Digital Adjustment: Operators need hyper-precise settings. Digital keypads eliminate analog guesswork. You can lock the settings to prevent tampering.
Automated Pressure Controls: Advanced systems automatically stop crimping. They halt when the exact pressure or diameter is reached. This prevents over-crimping perfectly.
Traceability and IoT: Modern crimpers record crimp data instantly. They send this data to quality assurance software. This provides robust compliance reporting for large clients.
Shortlisting Criteria
You must choose equipment based on assembly volume and precision requirements. We designed a simple chart to help you evaluate your needs.
Equipment Type
Best For
Key Advantage
Portable / Field Crimper
Emergency repairs, mobile fleets
Lightweight, runs on battery or hand pump
Shop-Floor Crimper
Daily maintenance, medium volume
Versatile die sets, reliable analog/digital dials
High-Volume Production
OEM manufacturing, large batches
Automated stops, IoT tracking, extreme speed
Portable crimpers handle emergency field repairs well. Shop-floor models manage daily maintenance tasks efficiently. High-volume production crimpers deliver ultimate speed and traceability. Match the machine capabilities to your daily output. Do not rely on a portable unit for constant high-volume production. It will wear out quickly and produce inconsistent results.
Conclusion
Hose crimping defects are highly preventable. You just need strict adherence to specifications and rigorous quality assurance. You must eliminate guesswork from your assembly benches entirely. Implement daily calibration checks and measure every final crimp. Enforce component compatibility rules without exception.
Investing in operator training pays for itself quickly. Upgrading to calibrated, modern crimping machinery offers a massive return on investment. You eliminate just one catastrophic field failure and the machine pays for itself. A standardized process protects your employees and your bottom line.
Audit your current crimping process today. Check your die tolerances for excessive wear. You can easily contact us to consult with a tooling specialist. Upgrade your shop's hydraulic assembly capabilities and secure your operations.
FAQ
Q: Can I re-crimp a hydraulic hose if it is under-crimped?
A: No. Re-crimping compromises the structural integrity of the metal ferrule and damages the internal wire braid. The assembly must be discarded and remade.
Q: How do I know what the correct crimp diameter is?
A: Crimp diameters are strictly dictated by the manufacturer of the specific hose and fitting combination. Never guess; always consult the manufacturer's current crimp chart.
Q: How often should a hose crimping machine be calibrated?
A: Calibration should ideally be checked daily or at the start of a new production run, with a comprehensive maintenance and die inspection scheduled monthly or quarterly depending on volume.
Q: Why did my fitting blow off even though the crimp diameter was correct?
A: Possible reasons include incorrect hose insertion depth, failure to skive the hose (if required), or mixing incompatible hose and fitting brands, which disrupts the engineered bite of the ferrule.
Handanshi Kangmai Hydraulic Equipment Co., Ltd. is located in the east of Wangzhuang,on the Hanlin expressway. Our main products have 9 series and 50 types which contains hose crimping machine, hose cutting machine,hose skiving machine...